

Bedazzled Christmas Ornament Ideas and Supplies
Rhinestones on a Christmas ornament can look like a treasured vintage jewel box or like a craft store had an unfortunate encounter with a leaf blower. The difference is not the number of crystals. It’s the plan.
If you want a little maximalism that still feels intentional, we’re going to work with one ornament shape, one clear focal pattern and an edited palette. Burgundy, champagne and antique gold? Wonderful. Twelve neon colors, three glitter adhesives and a surprise foam snowflake? Let’s discuss your options.
This guide covers how to bedazzle Christmas ornaments, which glue and flatback stones to use, how to avoid obvious gaps, how long to allow for curing and what a beginner actually needs to buy. It also includes a small supply guide for a group craft night.
How to Make Elegant Bedazzled Christmas Ornaments
Choose a design before touching the glue. Try a starburst from the center, a single diagonal band, or a scattered constellation with plenty of visible glass between stones. A cluster of stones in one defined area often looks more deliberate than random gems covering every millimeter.
An unpainted clear ornament will show adhesive and fingerprints more than an opaque or frosted blank. Clean the surface with a material-appropriate cleaner, let it dry fully and test a small patch first. Thin or fragile glass needs extra care.
Best first project: make one champagne-and-clear crystal ornament with a small asymmetrical cluster. Start there; you can build the disco-ball tree later.
As an Amazon Associate I earn from qualifying purchases. Some links in this article may earn Catching Print Co. a commission at no extra cost to you. Thank you for supporting our business. Check Amazon for current product details and availability.
Essential Supplies for Bedazzled Christmas Ornaments
Choose a blank with a surface you can control
Clear glass looks beautiful in warm tree lighting, but it is fragile and any messy adhesive will show. Consider shatter-resistant blanks for large groups, and keep delicate glass away from small children and active pets.
Small resin gems are lightweight and inexpensive for practice. Their appearance differs from glass crystals; use them for bold color rather than pretending they’re cut gemstones.

FOR THE PERFECT BLANK CANVAS
4E’s Novelty 12-Pack 3.15-Inch Clear Glass Ornaments
Good for delicate sparkling designs that catch tree lighting. Fragile; keep securely supported and avoid incompatible adhesives.
A small thank-you: this link supports our business.
Start with a restrained ornament design: one focal area, one accent material, and plenty of visible negative space. This is the fastest way to make a DIY bedazzled Christmas ornament look polished, even if you are working with inexpensive flatback rhinestones.

FOR BIG SPARKLE ON A BUDGET
34,000-Piece 3mm Jelly Rhinestone Set with 3 B7000 Glues
An abundant practice set for small color clusters and test pieces. Resin stones look different from glass crystals; choose deliberately.
A small thank-you: this link supports our business.
Place each gem accurately instead of chasing it across the table
A wax picker and fine tweezers are useful for tiny stones. Place them on the tabletop in a simple row before starting so you can check spacing visually.
Some clear craft glues are marketed for rhinestone work, but different surfaces have different adhesion requirements. Check compatibility, ventilation needs and full curing instructions. Keep adhesive off skin and away from kids and pets.
Clean glass or plastic ornaments before adding glue so dust and fingerprints do not affect adhesion. Work with the ornament resting in a small cup or ring of fabric, which keeps it stable while you place rhinestones and helps prevent accidental smudges.

FOR PRECISE STONE PLACEMENT
Rhinestone Wax Picker with Tweezers
Makes tiny precise placement much easier than bare fingertips. Replace wax tips when worn and avoid scratching the ornament finish.
A small thank-you: this link supports our business.
Arrange a small test pattern before committing glue. A single stripe, clustered constellation, or band around the ornament cap often looks more elevated than full coverage. Consistent spacing is what makes rhinestone ornament designs read as intentional rather than busy.

FOR CLEAN, CONTROLLED GLUE
B7000 Craft Glue, Two 110ml Bottles + Dotting Tools
Precision application for surfaces compatible with the glue. Follow all ventilation, surface and full-cure instructions.
A small thank-you: this link supports our business.
Use one star material and one supporting texture
Clear AB crystals reflect surrounding colors and work well as the primary sparkle. Self-adhesive gems offer low-mess decoration on paper tags or cards, but are usually less reliable on curved glass than a properly bonded flatback.
For the elevated look, repeat a single stone size, then add a few larger accent shapes. Varying everything simultaneously reads busy.
Use a wax picker or tweezers to place one rhinestone at a time, then pause after a short row to check alignment. It is easier to correct spacing before adhesive sets than to pry up a gem later and risk leaving visible glue marks.

FOR AN IRIDESCENT FINISH
Jollin Crystal AB Flatback Rhinestones
An iridescent focal sparkle for an edited luxe palette. Confirm stone size and adhesive compatibility.
A small thank-you: this link supports our business.
Choose embellishments with the tree’s lighting in mind. Clear or AB rhinestones catch warm light beautifully, while black, jewel-tone, or metallic gems create contrast in daylight. Mixing too many finishes at once can make even high-quality materials look visually noisy.
Pick a color palette before opening a single gem packet. Two or three related shades usually create a more expensive-looking bedazzled ornament than a full rainbow. A little restraint leaves room for the tree lights to do some of the sparkling work.

FOR AN EASY NO-GLUE DETAIL
MYDBUYSOME 2,774 Self-Adhesive Gems, 10 Sheets
A fast, low-mess option for gift tags and paper ornament cards. Sticker adhesion on curved glass may not be lasting.
A small thank-you: this link supports our business.
Add drama in a controlled line
A narrow rhinestone chain is easier for a linear edge than individually aligning a hundred gems, but check how it follows a curved ornament before using glue.
Black stones create a striking contrast with champagne or clear ornaments and can give a vintage Art Deco feel. Try one small black starburst or a single initial-style silhouette with no lettering needed.
Let finished ornaments cure undisturbed on a protected tray, then store them with tissue or soft paper between pieces. Gentle handling preserves the glued details and keeps your bedazzled holiday ornaments looking finished rather than chipped when next season arrives.
Protect your work surface with parchment paper or a disposable mat before using craft glue. Rhinestones are charming; permanently gluing one to your dining table is a less festive form of commitment. Keep a damp cloth nearby for prompt cleanup.

FOR ONE PERFECT SPARKLING LINE
Dowarm 2mm Crystal Rhinestone Chain Trim
A more efficient way to make one clean sparkling line. Test the trim around curves before committing adhesive.
A small thank-you: this link supports our business.
Work in small sections so adhesive does not skin over before the rhinestones land. A thin line of glue, a short row of stones, then a quick alignment check is calmer and cleaner than covering the whole ornament in glue and hoping for the best.
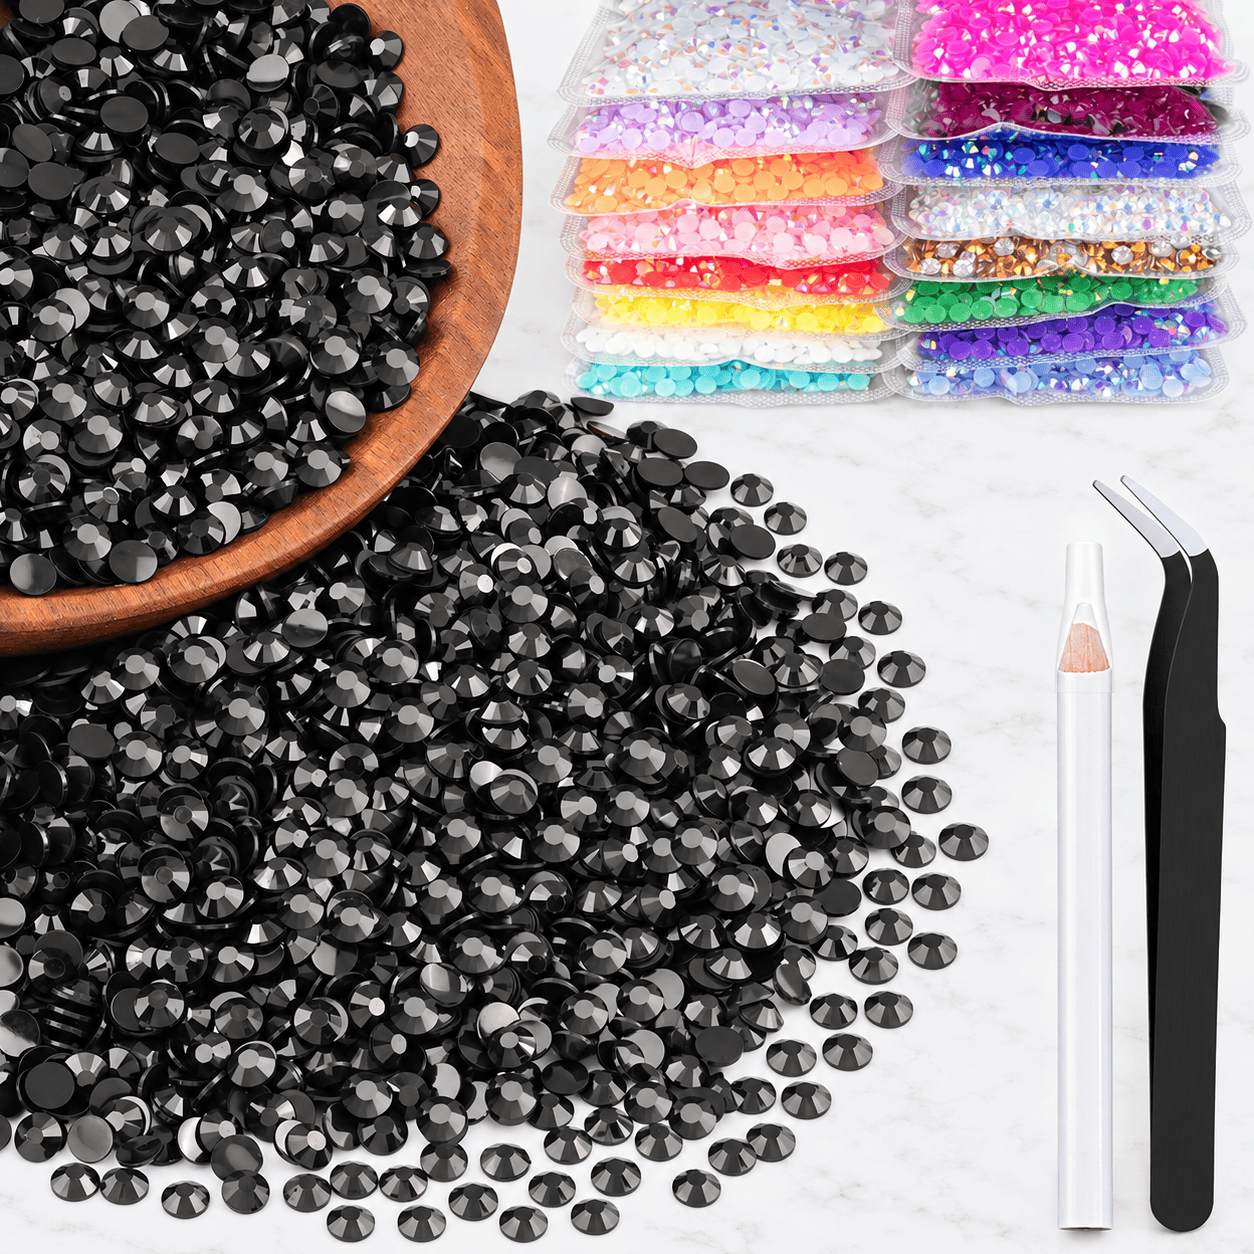
FOR BLACK-AND-CHAMPAGNE DRAMA
5,000-Piece 3mm Black Resin Flatback Rhinestones
For modern black-and-champagne accents that look less predictable. Keep black stones sparse if the base is dark.
A small thank-you: this link supports our business.
Finish cleanly, then give everything time to cure
Mixed gem shapes are great for the whimsical friend who wants a tiny star or heart centerpiece. A clear organizer keeps one stone size from invading every other color compartment.
Allow the adhesive its full manufacturer-stated cure time before bagging, stacking or hanging. A beautiful wet ornament can be ruined in the first ten minutes inside a box.
Consider the ornament’s viewing angle. The prettiest design should face outward when it hangs on a tree, not hide behind the branch. Mark the top cap and test the orientation before you build a detailed pattern around the entire surface.

FOR STATEMENT GEM SHAPES
JPSOR 900 Flatback Gems in Nine Shapes
A variety of larger accent shapes without shopping for each individually. Mixed-size pieces need slightly different glue and spacing.
A small thank-you: this link supports our business.
For a coordinated set of handmade ornaments, repeat one detail across every piece: the same ribbon, one gem color, or a shared stripe pattern. Variation in the main design keeps them interesting, while the repeated detail makes the collection feel intentional.

FOR KEEPING EVERYTHING SORTED
Citylife Clear Craft Organizer with Tray
Worthwhile if you’re doing a group night or plan to repeat the craft. Overkill for a single ornament; repurpose a divided food-safe-free tray instead.
A small thank-you: this link supports our business.
60-Minute Bedazzled Ornament Workshop
The point of this schedule is to remove friction, not to turn a creative afternoon into a mandatory corporate retreat. Adapt the timing to your space and your group.
| When | What to do |
|---|---|
| 0–10 minutes | Choose color palette and arrange a dry stone pattern. |
| 10–15 minutes | Clean and dry the blank; test adhesion on a hidden area. |
| 15–45 minutes | Apply compatible glue and place stones gradually. |
| 45–60 minutes | Check gaps, clean safe surface edges and label each ornament for drying. |
| After the party | Follow adhesive full cure instructions before handling or hanging. |
Bedazzled Ornament Supply Checklist
- One appropriate ornament blank per person plus a spare
- One style of flatback gems and a handful of accent stones
- One precision pickup tool for each active workspace
- Surface-compatible adhesive with ventilation and cure guidance
- Lined drying trays and labels
- Skip hotfix-only rhinestones on fragile glass unless the supplier specifically approves that method
Bedazzled Ornament FAQs
Will rhinestones stay on a Christmas ornament?
They can with compatible surfaces, correct adhesive and full cure time, but no DIY finish is indestructible. Always test a small area before decorating an heirloom.
Can I use hotfix rhinestones on glass?
Many hotfix tools are designed for fabric and heat-safe materials. Do not assume a hot applicator is safe on thin glass or plastic ornaments.
How do I make an ornament look expensive?
Use fewer colors, consistent spacing, one focal shape, high contrast and a thoughtful ribbon rather than covering every surface.
What is the easiest bedazzled ornament for beginners?
An asymmetrical cluster of a single stone size on a smooth, securely held blank. It offers a finished look without exact grids or dense patterns.
How to Finish a Bedazzled Ornament Cleanly
Your ornament does not need to sparkle hard enough to signal the neighbors. It just needs to look like you made a few decisions on purpose. A little drama, well placed, is the best kind of holiday decoration.
Let glue cure for the full time listed by its manufacturer before hanging or packing the ornament. A project can look finished long before it is ready to be handled. Patience is not glamorous, but neither is finding rhinestones in the storage box.







Leave a Reply